
Python ETL 개선하기
def transform(text):
    lines = text.strip().split("\n")[1:] # 첫 번째 라인을 제외하고 처리
    records = []
    for l in lines:
      (name, gender) = l.split(",") # l = "Keeyong,M" -> [ 'keeyong', 'M' ]
      records.append([name, gender])
    return records

def load(records):
    """
    records = [
      [ "Keeyong", "M" ],
      [ "Claire", "F" ],
      ...
    ]
    """
    schema = "keeyong"
    # BEGIN과 END를 사용해서 SQL 결과를 트랜잭션으로 만들어주는 것이 좋음
    cur = get_Redshift_connection()
    try:
        cur.execute("BEGIN;")
        cur.execute(f"DELETE FROM {schema}.name_gender;")
        # DELETE FROM을 먼저 수행 -> FULL REFRESH을 하는 형태
        for r in records:
            name = r[0]
            gender = r[1]
            print(name, "-", gender)
            sql = f"INSERT INTO {schema}.name_gender VALUES ('{name}', '{gender}')"
            cur.execute(sql)
        cur.execute("COMMIT;")   # cur.execute("END;")
    except (Exception, psycopg2.DatabaseError) as error:
        print(error)
        cur.execute("ROLLBACK;")
        raise
Incremental Update
- 데이터 소스단에서 특정 날짜 기준으로 변경된 레코드들을 읽어올수 있는 방법을 지원해주지 않으면 불가능
일반적으로는 타임스탬프 필드나 일련 번호와 같은 변경 추적이 가능한 필드가 필요
- execution date: airflow가 incremental update 쉽게하라고 제공해주는 시스템 변수
Airflow 설치
1) 클라우드 버전 사용
AWS: MWAA(Managed Workflows for Apache Airflow)
구글 클라우드: Cloud Composer
Microsoft Azure: Azure Data Factory
-> 기본으로 서버를 3대 돌리기 때문에 비용이..
2) AWS EC2의 리눅스 서버(우분투) 위에서 Airflow를 설치
리눅스 이해하기
- 리눅스 배포판: 리눅스에는 많은 distribution들이 있다. 우분투, 데비안, 레드햇 등등..
- 리눅스 서버에 로그인 할때는 ssh 프로그램을 사용(Mac에는 기본으로 설치) id/pw를 이용해서 로그인 하는 것이 아닌 public key/private key를 만들고 private key를 가지고 로그인한다.
- sudo: superuser 권한을 가진 사용자는 sudo 명령을 사용하여 권한이 필요한 작업을 실행할 수 있다. 또한, sudo를 통해 다른 사용자로 변신할 수 있다(예: sudo su postgres, sudo su airflow)
- apt: apt는 우분투 계열 리눅스에서 프로그램을 설치, 삭제, 관리하는 패키지 관리자이다. apt-get 명령을 사용하여 프로그램을 관리다.
- su: substitute user 사용자를 변경하는 명령어. sudo su <사용자 id>
- EC2에서의 사용자 관리: EC2에서는 기본적으로 ubuntu라는 사용자 계정이 생성된다. 이 계정은 superuser 권한을 가지고 있으며, 처음에는 ubuntu로 로그인 후, 필요한 경우 다른 사용자 계정으로 변신하여 프로그램을 설치한다. 예를 들어, airflow와 postgres 사용자로 변신하여 해당 프로그램을 설치한다.
- 기본 텍스트 에디터: 기본적으로 vi라는 text editor를 사용
- Airflow 설치 경로: airflow는 기본적으로 /var/lib/ariflow/밑에 설치된다.
- Airflow 서버 사용자 계정: Airflow 서버에서는 세 가지 주요 계정이 사용된다: 리눅스에서는 보안이라는 관점에서 superuser로 모든 서비스를 설치하는 것은 추천되지 않는다. 그 서비스가 해킹되면 superuser권한이 해킹되기 때문에 보안이라는 관점에서 issue가 많다. 그래서 서비스별로 계정을 따로 만들고 그 계정에 필요한 만큼의 권한을 줌으로써 그 서비스가 해킹되었을 때 문제를 최소화한다.
- ubuntu: 기본 사용자, superuser 권한을 가짐
- postgres: PostgreSQL 설치 시 생성되는 계정, 이 계정을 이용해 PostgreSQL 액세스를 위한 별도의 Airflow 계정 별도로 생성
- airflow: Airflow 서비스가 실행되는 계정
- Airflow가 설치된 로컬 서버에 PostgreSQL을 별도로 설치한다.

3) 도커를 이용해 Airflow 설치
① 도커 엔진 설치, 실행
② Airflow 도커 이미지 다운로드
- 터미널 프로그램 실행하고 적당한 폴더로 이동
- airfow-setup Github repo 클론한다. git clone https://github.com/keeyong/airflow-setup.git
- cd airflow-setup, curl -LfO 'https://airflow.apache.org/docs/apache-airflow/2.9.1/docker-compose.yaml
이 docker-compose.yaml 파일은 Airflow 도커 이미지를 다운로드하고, 실행 환경을 설정하는 데 사용한다.
yaml은 많은 소프트웨어들이 사용하는 환경설정 파일 (xml,json 대체)
docker compose -f docker-compose.yaml pull
-> Docker Compose로 docker image를 실제로 다운받는다.
③ 이미지를 도커 컨테이너에 실행시킨다.
docker compose -f docker-compose.yaml up
다운받은 docker image를 docker container 위로 실행
Docker Compose로 컨테이너 실행: 다운받은 도커 이미지를 사용하여 도커 컨테이너에서 Airflow를 실행

④ Airflow WebServer에 WebBrowser를 통해 access
- http://localhost:8080
- 기본 아이디와 패스워드는 airflow:airflow 꼭바꾸자.
4) 사양이 좋은 EC2 리눅스 서버 만들고 그 안에 Docker Engine 설치 후 Docker Container 형태로 Airflow를 실행하기
Airflow 코드가 갖는 기본적인 구조
from airflow import DAG
from airflow.operators.bash import BashOperator
from datetime import datetime, timedelta #시간과 관련된 세팅 있기 때문에..
default_args = {
'owner': 'keeyong',
'start_date': datetime(2023, 5, 27, hour=0, minute=00),
'email': ['keeyonghan@hotmail.com'],
'retries': 1, #태스크가 실패하면 재시도 할지
'retry_delay': timedelta(minutes=3), #재시도 간에 얼마나 기다릴지
}
test_dag = DAG(
"dag_v1", # DAG name
schedule="0 9 * * *",
tags=['test'],
catchup=False,
default_args=default_args
)
t1 = BashOperator(
task_id='print_date',
bash_command='date', # 현재 시간 찍기
dag=test_dag)
t2 = BashOperator(
task_id='sleep',
bash_command='sleep 5', # 5초당안 가만히 있다가 task 종료
dag=test_dag)
t3 = BashOperator(
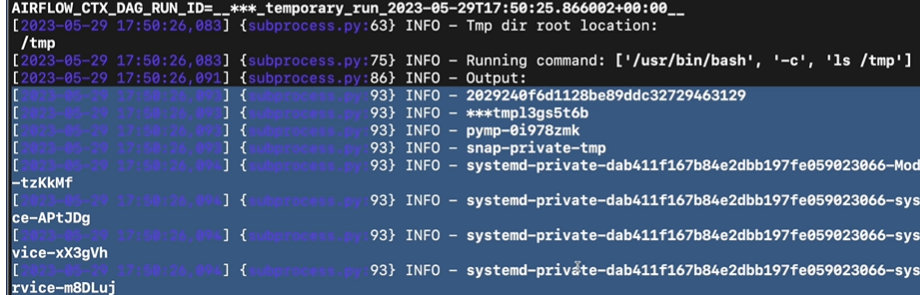
task_id='ls',
bash_command='ls /tmp', #tmp밑에 어떤 디렉토리 있는지 출력
dag=test_dag)
t1 >> [ t2, t3 ] # t1이 끝나면 t2,t3 동시에 실행되어라
1. DAG 생성 및 설정
① DAG 모듈 import
② DAG 객체 생성
dag 객체를 생성하며 여러 가지 파라미터를 지정
- dag_id: DAG의 이름
- schedule_interval: DAG의 실행 주기, cron 형식을 사용하여 지정
- start_date / end_date: DAG의 시작 날짜와 종료 날짜를 설정
- default_args: 태스크에 공통적으로 적용되는 설정을 딕셔너리 형태로 작성
- owner: DAG 작성자를 지정.
- max_active_runs: 한번에 동시에 실행될 수 있는 DAG의 수 몇개인지. 하지만 아무리 크게 잡아도 upper bound는 지금 Airflow Worker에 있는 CPU의 총합이 된다. 그래서 만약 Worker 노드가 한개 밖에 없고 그 Worker 노드의 CPU가 4개가 있으면 한 번에 실행될 수 있는 총 task의 갯수는 4개이다.
- max_active_tasks: 이 DAG에 속한 task가 동시에 몇번 실행 가능한지
- catchup 오늘이 2023.5.25인데 startdate이 2020.8.7이고 schedule이 @hourly 2년 9개월간의 실행 안된 날짜들에 대해서 매 시간마다 이 DAG를 실행하려 한다. 말그대로 catchup하려한다. (Startdate이 과거이고 오늘 처음 implementation하려하면) 그게 원하는게 아니면 catchup을 False로 세팅하면 된다. 특히 이 DAG가 full refresh를 하는 DAG이면 catch up은 항상 false로 하는게 좋다. 2년이 밀렸다해서 그걸 다 실행하나 지금한번 실행하나 똑같기 때문. 이 catchup은 incremental update할 때만 의미 있다.
- DAG parameter vs Task parameters 차이점 이해가 중요!

schedule같은경우 실행을 주기적으로 안한다하면 None, @once로 세팅(다른 DAG가 끝났을 때 trigger하는 형태로도 가능), @hourly, @dayliy같은 것들도 있음
default_arg에서는 on_failure_callback/on_success_callback도 가능
-> 태스크의 성공 또는 실패 시 특정 함수를 호출하도록 설정하는 데 사용.
예를 들어, 태스크가 실패했을 때 슬랙으로 알림을 보내고 싶다면, on_failure_callback에 알림 함수를 지정할 수 있다.
2. 태스크(Task) 생성
Airflow에서 태스크는 operator이다. 사용하고자 하는 Operator를 결정하고,
각 태스크의 고유 ID를 설정하고, 어떤 Operator 사용할건지, operator 맞게 파라미터를 지정
3. 태스크 순서 설정
몇개의 태스크로 DAG를 구성 할 것인지 각 태스크들 명확히 하고 실행 순서를 결정
이렇게 만든 코드를 웹 UI와 command line에서 실행 할 수 있다.
웹 UI

터미널
Airflow서버에 (Docker이건 EC2이건) 로그인하고(둘이 로그인하는 방법만 다르고 나머지는 같다)
로그인을 한다.
1) EC2


2) Docker
Docker의 scheduler 안으로 로그인해야된다.
먼저 docker container의 id를 알아내자

container로 로그인하려면 docker 명령어중에 docker exec -it <containerID> sh

그이후는 위의 Ec2와 동일
airflow dags list 명령 실행 -> 서버에 설치된 모든 DAG들을 보여준다.
airflow taks list DAG이름 -> dag 속한 모든 task가 list된다.
이제 DAG이름하고 Task이름 알 기 때문에 특정 task 실행하려면
airflow tasks test DAG이름 Task이름 날짜 ->날짜는 YYYY-MM-DD
start_date보다 과거인 경우는 실행이 되지만 오늘 날짜보다 미래인 경우 실행 안됨
이게 바로 execution_date의 값이 됨
test vs run
사실상 동일한 기능 run하면 meta_db에 기록이 되고 test는 안남는다.
이제부터 본격적으로 DAG를 작성해보자
1) Hello World 프로그램
① python operator를 사용
from airflow import DAG
from airflow.operators.python import PythonOperator
from datetime import datetime

dag = DAG(
    dag_id = 'HelloWorld',
    start_date = datetime(2022,5,5),
    catchup=False,
    tags=['example'],
    schedule = '0 2 * * *')

def print_hello():
    print("hello!")
    return "hello!"

def print_goodbye():
    print("goodbye!")
    return "goodbye!"

print_hello = PythonOperator(
    task_id = 'print_hello',
    #python_callable param points to the function you want to run
    python_callable = print_hello,
    #dag param points to the DAG that this task is a part of
    dag = dag)  #Parent Dag가 무엇인지 지정

print_goodbye = PythonOperator(
    task_id = 'print_goodbye',
    python_callable = print_goodbye,
    dag = dag)

#Assign the order of the tasks in our DAG
print_hello >> print_goodbye

#순서를 정의하지 않으면 각각이 동시에 개별적으로 실행된다.
PythonOperator import한후
dummy나 bash때와 마찬가지로 Operator로 인스턴스를 생성하여 태스크를 정의한다.
② task 데코레이터 사용
task 데코레이터를 사용하면 PythonOperator를 명시적으로 인스턴스화할 필요 없이,
Python 함수에 데코레이터를 추가하기만 하면 된다.
airflow.decorators에서 task를 import하고 @task 사용
task_id를 별도로 지정하지 않으면 함수이름이 태스크 ID가 된다.
from airflow import DAG
from airflow.decorators import task
from datetime import datetime

@task
def print_hello():
    print("hello!")
    return "hello!"

@task
def print_goodbye():
    print("goodbye!")
    return "goodbye!"

with DAG(
    dag_id = 'HelloWorld_v2',
    start_date = datetime(2022,5,5),
    catchup=False,
    tags=['example'],
    schedule = '0 2 * * *'
) as dag:

    # Assign the tasks to the DAG in order
    print_hello() >> print_goodbye()
2) Name Gender 예제 프로그램
S3에서 name_gender.csv다운 -> Redshift에 적재 하는 프로그램
airflow 환경으로 포팅. 5번에 걸쳐서 Airflow에 어울리는 코드를 짜보자.
① 거의 변경없이 포팅
from airflow import DAG
from airflow.operators.python import PythonOperator
from datetime import datetime
import requests
import logging
import psycopg2

def get_Redshift_connection():
    host = "learnde.cduaw970ssvt.ap-northeast-2.redshift.amazonaws.com"
    user = "keeyong"  # 본인 ID 사용
    password = "..."  # 본인 Password 사용
    port = 5439
    dbname = "dev"
    conn = psycopg2.connect(f"dbname={dbname} user={user} host={host} password={password} port={port}")
    conn.set_session(autocommit=True)
    return conn.cursor()


def extract(url):
    logging.info("Extract started")
    f = requests.get(url)
    logging.info("Extract done")
    return (f.text)


def transform(text):
    logging.info("Transform started")
    lines = text.strip().split("\n")[1:] # 첫 번째 라인을 제외하고 처리
    records = []
    for l in lines:
      (name, gender) = l.split(",") # l = "Keeyong,M" -> [ 'keeyong', 'M' ]
      records.append([name, gender])
    logging.info("Transform ended")
    return records


def load(records):
    logging.info("load started")
    """
    records = [
      [ "Keeyong", "M" ],
      [ "Claire", "F" ],
      ...
    ]
    """
    schema = "keeyong"
    # BEGIN과 END를 사용해서 SQL 결과를 트랜잭션으로 만들어주는 것이 좋음
    cur = get_Redshift_connection()
    try:
        cur.execute("BEGIN;")
        cur.execute(f"DELETE FROM {schema}.name_gender;")
        # DELETE FROM을 먼저 수행 -> FULL REFRESH을 하는 형태
        for r in records:
            name = r[0]
            gender = r[1]
            print(name, "-", gender)
            sql = f"INSERT INTO {schema}.name_gender VALUES ('{name}', '{gender}')"
            cur.execute(sql)
        cur.execute("COMMIT;")   # cur.execute("END;")
    except (Exception, psycopg2.DatabaseError) as error:
        print(error)
        cur.execute("ROLLBACK;")
    logging.info("load done")


def etl():
    link = "https://s3-geospatial.s3-us-west-2.amazonaws.com/name_gender.csv"
    data = extract(link)
    lines = transform(data)
    load(lines)


dag_second_assignment = DAG(
	dag_id = 'name_gender',
	catchup = False,
	start_date = datetime(2023,4,6), # 날짜가 미래인 경우 실행이 안됨
	schedule = '0 2 * * *')  # 적당히 조절

task = PythonOperator(
	task_id = 'perform_etl',
	python_callable = etl,
	dag = dag_second_assignment)
여기서 3개의 함수를 하나의 task로 만들었다. ->하나의 PythonOperator로
문제점
- Redshift_connection과 관련된 정보들이 하드코딩되어있다.(Url, User, password 노출)
- csv파일 링크도 하드코딩되어있다. 환경변수로 빼놓자.
- ELT 각각을 task로, 그리고 task decorator 적용
해결방법
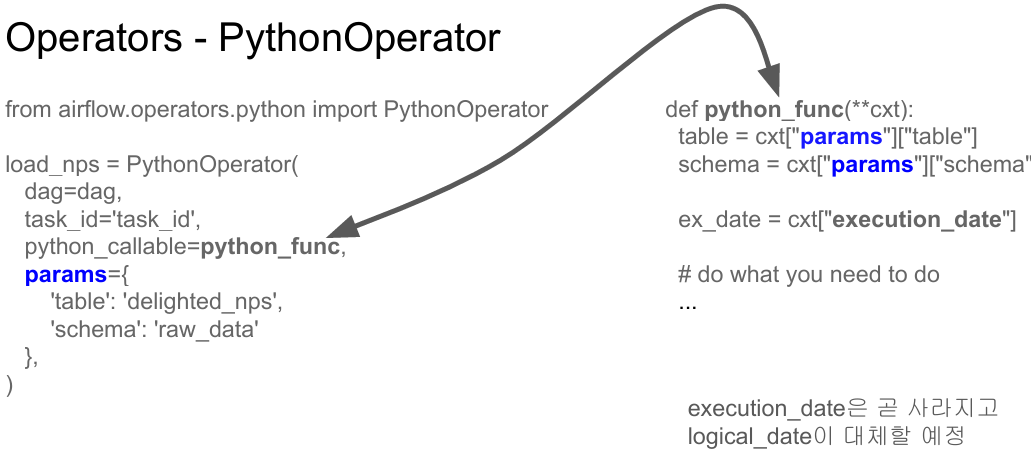
- params를 통해 변수를 넘기자.
PythonOperator에 params라는 파라미터가 있다. python_callable로 operator가 실행 될 때 실행해야하는 함수의 이름을 지정할 수 있고 함수에 변수들을 pass하고 싶을때 이 params를 쓴다. params의 dictionary형태의 변수들을 넘기고 그 변수들을 python_callable에 지정된 함수에서 받을 수 있는 방법이 있었다. 그걸 사용해서 읽어와야할 csv파일을 하드코딩하지않고 인자로 넘겨보자.
- execution_date(logical_date) 얻어내기, Airflow가 가지는 시스템 변수들 어떻게 읽어올것인지.
②
from airflow import DAG
from airflow.operators.python import PythonOperator
from airflow.models import Variable

from datetime import datetime
from datetime import timedelta
import requests
import logging
import psycopg2


def get_Redshift_connection():
    host = "learnde.cduaw970ssvt.ap-northeast-2.redshift.amazonaws.com"
    redshift_user = "keeyong"  # 본인 ID 사용
    redshift_pass = "..."  # 본인 Password 사용
    port = 5439
    dbname = "dev"
    conn = psycopg2.connect(f"dbname={dbname} user={redshift_user} host={host} password={redshift_pass} port={port}")
    conn.set_session(autocommit=True)
    return conn.cursor()


def extract(url):
    logging.info("Extract started")
    f = requests.get(url)
    logging.info("Extract done")
    return (f.text)


def transform(text):
    logging.info("Transform started")
    lines = text.strip().split("\n")[1:] # 첫 번째 라인을 제외하고 처리
    records = []
    for l in lines:
      (name, gender) = l.split(",") # l = "Keeyong,M" -> [ 'keeyong', 'M' ]
      records.append([name, gender])
    logging.info("Transform ended")
    return records


def load(records):
    logging.info("load started")
    """
    records = [
      [ "Keeyong", "M" ],
      [ "Claire", "F" ],
      ...
    ]
    """
    schema = "keeyong"
    # BEGIN과 END를 사용해서 SQL 결과를 트랜잭션으로 만들어주는 것이 좋음
    cur = get_Redshift_connection()
    try:
        cur.execute("BEGIN;")
        cur.execute(f"DELETE FROM {schema}.name_gender;")
        # DELETE FROM을 먼저 수행 -> FULL REFRESH을 하는 형태
        for r in records:
            name = r[0]
            gender = r[1]
            print(name, "-", gender)
            sql = f"INSERT INTO {schema}.name_gender VALUES ('{name}', '{gender}')"
            cur.execute(sql)
        cur.execute("COMMIT;")   # cur.execute("END;")
    except (Exception, psycopg2.DatabaseError) as error:
        print(error)
        cur.execute("ROLLBACK;")
    logging.info("load done")

def etl(**context):
    link = context["params"]["url"]
    # task 자체에 대한 정보 (일부는 DAG의 정보가 되기도 함)를 읽고 싶다면 context['task_instance'] 혹은 context['ti']를 통해 가능
    # https://airflow.readthedocs.io/en/latest/_api/airflow/models/taskinstance/index.html#airflow.models.TaskInstance
    task_instance = context['task_instance']  #Airflow가 관리하는 시스템 변수. 지금 실행되는 task의 unique id
    execution_date = context['execution_date']

    logging.info(execution_date)

    data = extract(link)
    lines = transform(data)
    load(lines)


dag = DAG(
    dag_id = 'name_gender_v2',
    start_date = datetime(2023,4,6), # 날짜가 미래인 경우 실행이 안됨
    schedule = '0 2 * * *',  # 적당히 조절
    catchup = False,
    max_active_runs = 1,
    default_args = {
        'retries': 1,
        'retry_delay': timedelta(minutes=3),
    }
)


task = PythonOperator(
    task_id = 'perform_etl',
    python_callable = etl,
    params = {
        'url': "https://s3-geospatial.s3-us-west-2.amazonaws.com/name_gender.csv"
    },
    dag = dag)
③
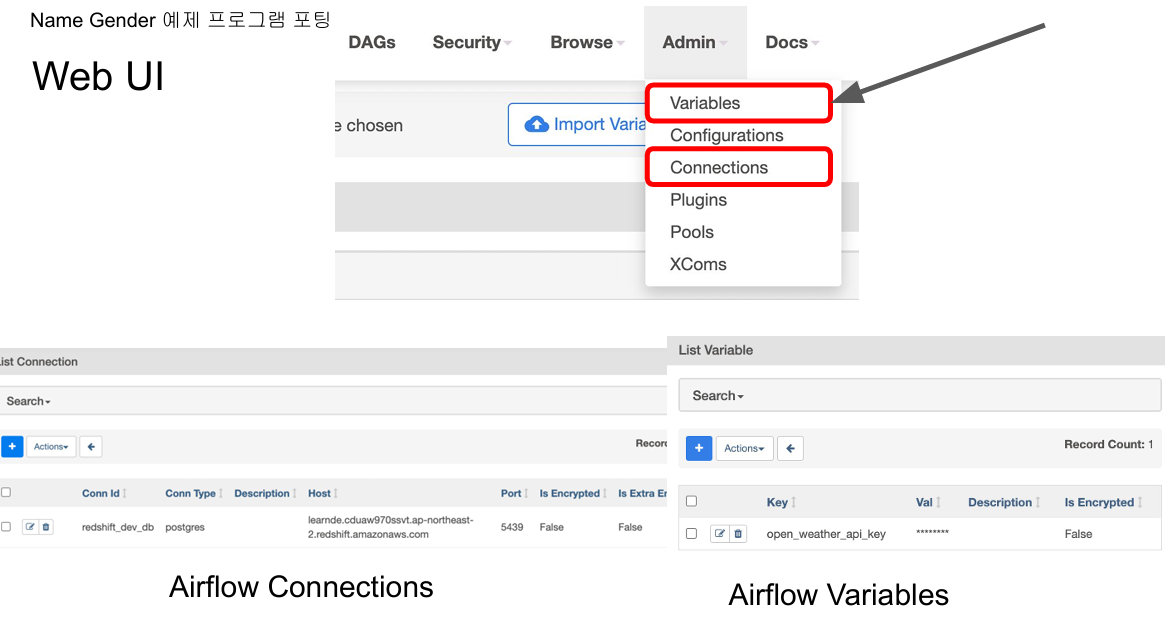
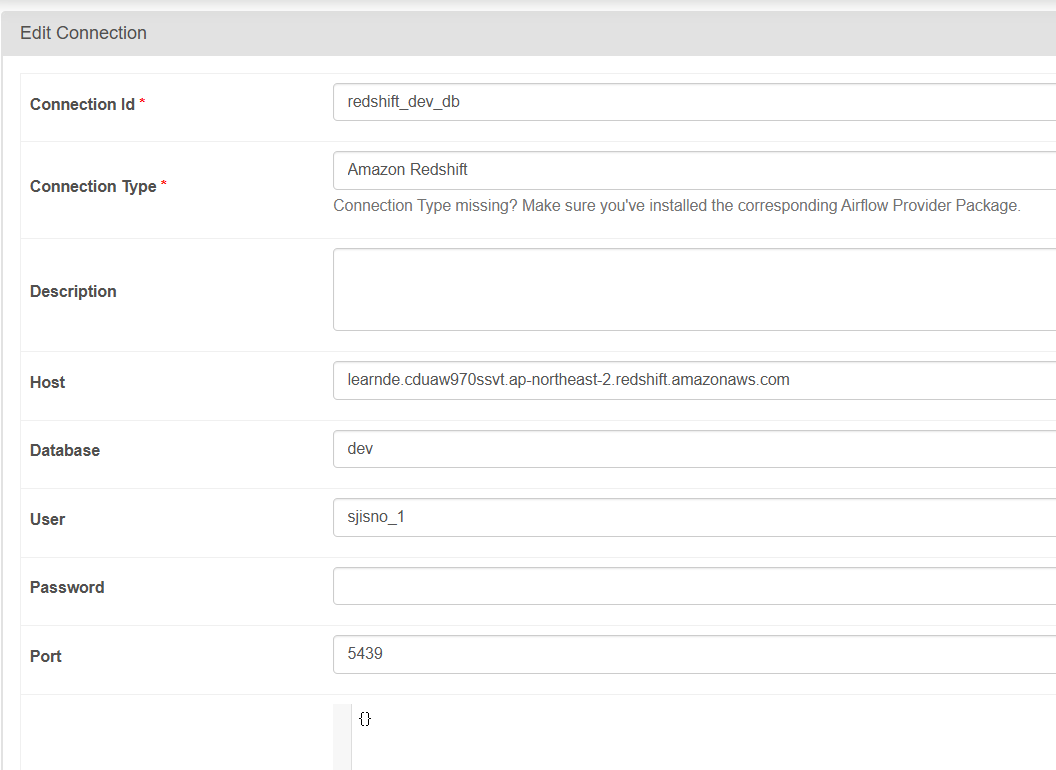
Connections and Variables
Connections: used to store some connection related info for Postgres connection or Redshif connection info
Variables : Used to store API keys or some configuration info, Use "access" or "secret" in the name if you want its value to be encrypted

이번에는 ETL을 3개의 태스크로 나눠보자.
Xcom: 태스크들 간에 데이터를 주고받기 위한 방식
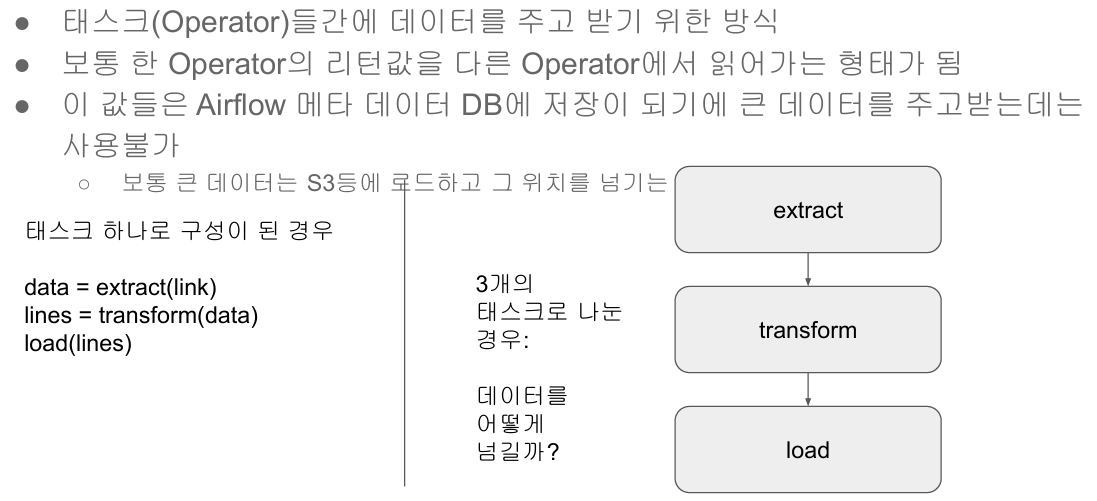
Xcom을 사용하자
첫번째 Operator의 출력값이 다음 PythonOperator의 입력값이 되도록 설정하자.
모든 task의 return값은 meta_data DB에 저장이 되기 때문에
그 다음 task 실행 될 때 앞에 실행되었던 taskID 주면서 taskID가 return했던 값을 알 수 있다.
-> Airflow가 어느 task건 return값이 있으면 id와 함꼐 기록하기 때문에 가능하다.
하지만 데이타 너무 크면 DB에 저장 못하고 S3에 저장하고 저장된 링크를 리턴한다.
즉 xcom_pull은 큰데이터를 task간에 주고받아야할 때는 사용할 수 없다.
from airflow import DAG
from airflow.operators.python import PythonOperator
from airflow.models import Variable

from datetime import datetime
from datetime import timedelta
import requests
import logging
import psycopg2

def get_Redshift_connection():
    host = "learnde.cduaw970ssvt.ap-northeast-2.redshift.amazonaws.com"
    redshift_user = "keeyong"  # 본인 ID 사용
    redshift_pass = "..."  # 본인 Password 사용
    port = 5439
    dbname = "dev"
    conn = psycopg2.connect(f"dbname={dbname} user={redshift_user} host={host} password={redshift_pass} port={port}")
    conn.set_session(autocommit=True)
    return conn.cursor()


def extract(**context):
    link = context["params"]["url"]
    task_instance = context['task_instance']
    execution_date = context['execution_date']

    logging.info(execution_date)
    f = requests.get(link)
    return (f.text)


def transform(**context):
    logging.info("Transform started")
    text = context["task_instance"].xcom_pull(key="return_value", task_ids="extract")
    lines = text.strip().split("\n")[1:] # 첫 번째 라인을 제외하고 처리
    records = []
    for l in lines:
      (name, gender) = l.split(",") # l = "Keeyong,M" -> [ 'keeyong', 'M' ]
      records.append([name, gender])
    logging.info("Transform ended")
    return records


def load(**context):
    logging.info("load started")
    schema = context["params"]["schema"]
    table = context["params"]["table"]

    lines = context["task_instance"].xcom_pull(key="return_value", task_ids="transform")
    """
    records = [
      [ "Keeyong", "M" ],
      [ "Claire", "F" ],
      ...
    ]
    """
    # BEGIN과 END를 사용해서 SQL 결과를 트랜잭션으로 만들어주는 것이 좋음
    cur = get_Redshift_connection()
    try:
        cur.execute("BEGIN;")
        cur.execute(f"DELETE FROM {schema}.name_gender;")
        # DELETE FROM을 먼저 수행 -> FULL REFRESH을 하는 형태
        for r in records:
            name = r[0]
            gender = r[1]
            print(name, "-", gender)
            sql = f"INSERT INTO {schema}.name_gender VALUES ('{name}', '{gender}')"
            cur.execute(sql)
        cur.execute("COMMIT;")   # cur.execute("END;")
    except (Exception, psycopg2.DatabaseError) as error:
        print(error)
        cur.execute("ROLLBACK;")
    logging.info("load done")


dag = DAG(
    dag_id = 'name_gender_v3',
    start_date = datetime(2023,4,6), # 날짜가 미래인 경우 실행이 안됨
    schedule = '0 2 * * *',  # 적당히 조절
    catchup = False,
    max_active_runs = 1,
    default_args = {
        'retries': 1,
        'retry_delay': timedelta(minutes=3),
    }
)


extract = PythonOperator(
    task_id = 'extract',
    python_callable = extract,
    params = {
        'url':  Variable.get("csv_url")
    },
    dag = dag)

transform = PythonOperator(
    task_id = 'transform',
    python_callable = transform,
    params = {
    },
    dag = dag)

load = PythonOperator(
    task_id = 'load',
    python_callable = load,
    params = {
        'schema': 'keeyong',
        'table': 'name_gender'
    },
    dag = dag)

extract >> transform >> load
바뀐점
- airflow.models 의 Variable import
Airflow가 가지고 있는 Key-Value Storage를 Access할 때 사용하는 모듈이다. Get, Set 두가지 메소드가 있다.
Get은 Key를 주고 해당 값을 읽어오고 Set은 Key와 Value를 세팅해주는 함수
Variable.get("csv_url") 로 읽고 싶은 key값 지정

- 각각이 하나의 python Operator가 되기 때문에 인자로 **context 추가
- transform에서 text = context["task_instance"].xcom_pull(key="return_value", task_ids="extract") xcom사용
extract라는 task의 return값을 읽어와라. 앞에 extract가 실행되고 이 함수의 task_id가 extract이기 때문에
context에서 task_instance를 읽어오고 그것의 메소드 중 xcom_pull을 호출해서
④
Redshift Connection과 관련된 sensative한 정보들을 환경설정으로 빼놓자.

from airflow import DAG
from airflow.operators.python import PythonOperator
from airflow.models import Variable
from airflow.providers.postgres.hooks.postgres import PostgresHook

from datetime import datetime
from datetime import timedelta
# from plugins import slack

import requests
import logging
import psycopg2


def get_Redshift_connection(autocommit=True):
    hook = PostgresHook(postgres_conn_id='redshift_dev_db')
    conn = hook.get_conn()
    conn.autocommit = autocommit
    return conn.cursor()


def extract(**context):
    link = context["params"]["url"]
    task_instance = context['task_instance']
    execution_date = context['execution_date']

    logging.info(execution_date)
    f = requests.get(link)
    return (f.text)


def transform(**context):
    logging.info("Transform started")
    text = context["task_instance"].xcom_pull(key="return_value", task_ids="extract")
    lines = text.strip().split("\n")[1:] # 첫 번째 라인을 제외하고 처리
    records = []
    for l in lines:
      (name, gender) = l.split(",") # l = "Keeyong,M" -> [ 'keeyong', 'M' ]
      records.append([name, gender])
    logging.info("Transform ended")
    return records


def load(**context):
    logging.info("load started")
    schema = context["params"]["schema"]
    table = context["params"]["table"]

    records = context["task_instance"].xcom_pull(key="return_value", task_ids="transform")
    """
    records = [
      [ "Keeyong", "M" ],
      [ "Claire", "F" ],
      ...
    ]
    """
    # BEGIN과 END를 사용해서 SQL 결과를 트랜잭션으로 만들어주는 것이 좋음
    cur = get_Redshift_connection()
    try:
        cur.execute("BEGIN;")
        cur.execute(f"DELETE FROM {schema}.name_gender;")
        # DELETE FROM을 먼저 수행 -> FULL REFRESH을 하는 형태
        for r in records:
            name = r[0]
            gender = r[1]
            print(name, "-", gender)
            sql = f"INSERT INTO {schema}.name_gender VALUES ('{name}', '{gender}')"
            cur.execute(sql)
        cur.execute("COMMIT;")   # cur.execute("END;")
    except (Exception, psycopg2.DatabaseError) as error:
        print(error)
        cur.execute("ROLLBACK;")
        raise
    logging.info("load done")


dag = DAG(
    dag_id = 'name_gender_v4',
    start_date = datetime(2023,4,6), # 날짜가 미래인 경우 실행이 안됨
    schedule = '0 2 * * *',  # 적당히 조절
    max_active_runs = 1,
    catchup = False,
    default_args = {
        'retries': 1,
        'retry_delay': timedelta(minutes=3),
        # 'on_failure_callback': slack.on_failure_callback,
    }
)


extract = PythonOperator(
    task_id = 'extract',
    python_callable = extract,
    params = {
        'url':  Variable.get("csv_url")
    },
    dag = dag)

transform = PythonOperator(
    task_id = 'transform',
    python_callable = transform,
    params = {
    },
    dag = dag)

load = PythonOperator(
    task_id = 'load',
    python_callable = load,
    params = {
        'schema': 'keeyong',   ## 자신의 스키마로 변경
        'table': 'name_gender'
    },
    dag = dag)

extract >> transform >> load
바뀐점
- PostgresHook을 import했다.
- get_Redshfit_connection함수를 보면 굉장히 단순해졌다. PostgresHook을 부르면서 만든 connection_id를 지정해준다.
- defalut_args에 on_failure_callback을 지정해줬다. (default_args는 모든 task에 적용되는 설정)
지금은 주석처리 했지만 slack과 관련된 모듈을 하나 만들어놓고 에러가 어떤 dag의 어떤 task에 났는지 메세지를 보낼 수 있다.
⑤
이제 task decorator를 사용하자.
이 경우 xcom을 사용하지 않아도 airflow가 알아서 일들을 해준다.
task decorater를 쓰는 경우 PythonOperator를 직접 지정 안하고 python 함수들을 바로 사용할 수 있어 전반적으로 깔끔해진다.
from airflow import DAG
from airflow.models import Variable
from airflow.providers.postgres.hooks.postgres import PostgresHook
from airflow.decorators import task

from datetime import datetime
from datetime import timedelta

import requests
import logging


def get_Redshift_connection(autocommit=True):
    hook = PostgresHook(postgres_conn_id='redshift_dev_db')
    conn = hook.get_conn()
    conn.autocommit = autocommit
    return conn.cursor()


@task
def extract(url):
    logging.info(datetime.utcnow())
    f = requests.get(url)
    return f.text


@task
def transform(text):
    lines = text.strip().split("\n")[1:] # 첫 번째 라인을 제외하고 처리
    records = []
    for l in lines:
      (name, gender) = l.split(",") # l = "Keeyong,M" -> [ 'keeyong', 'M' ]
      records.append([name, gender])
    logging.info("Transform ended")
    return records


@task
def load(schema, table, records):
    logging.info("load started")
    cur = get_Redshift_connection()
    """
    records = [
      [ "Keeyong", "M" ],
      [ "Claire", "F" ],
      ...
    ]
    """
    # BEGIN과 END를 사용해서 SQL 결과를 트랜잭션으로 만들어주는 것이 좋음
    try:
        cur.execute("BEGIN;")
        cur.execute(f"DELETE FROM {schema}.name_gender;")
        # DELETE FROM을 먼저 수행 -> FULL REFRESH을 하는 형태
        for r in records:
            name = r[0]
            gender = r[1]
            print(name, "-", gender)
            sql = f"INSERT INTO {schema}.name_gender VALUES ('{name}', '{gender}')"
            cur.execute(sql)
        cur.execute("COMMIT;")   # cur.execute("END;")
    except (Exception, psycopg2.DatabaseError) as error:
        print(error)
        cur.execute("ROLLBACK;")
    logging.info("load done")


with DAG(
    dag_id='namegender_v5',
    start_date=datetime(2022, 10, 6),  # 날짜가 미래인 경우 실행이 안됨
    schedule='0 2 * * *',  # 적당히 조절
    max_active_runs=1,
    catchup=False,
    default_args={
        'retries': 1,
        'retry_delay': timedelta(minutes=3),
        # 'on_failure_callback': slack.on_failure_callback,
    }
) as dag:

    url = Variable.get("csv_url")
    schema = 'keeyong'   ## 자신의 스키마로 변경
    table = 'name_gender'

    lines = transform(extract(url))
    load(schema, table, lines)
바뀐점
- PythonOperator import하지않고 대신 airflow.decorators의 task를 import한다.
- 그리고 ETL에 각각 @task 붙인다.
- 또한 함수의 인자들이 PythonOperator에서 필요한 인자가 **context가 아니라 그냥 평범한 인자들이다.
실행 데모
web ui
먼저 작성한 5개의 DAG코드들을 docker의 DAGS폴더에 복사해야한다. ( airflow-setup의 dags폴더에)


clone 받은 repo의 파일들을 airflow/setup의 dags에 복사


이제 airflow의 localshost:8080을 통해 webserver에 접속
Web UI를 통해서 Admin에서 variables와 connections를 세팅, 그 후 dag들을 활성화해 실행해 log명령을 통해 어떤 결과 나오는지 확인 할 수 있다.


command line
docker scheduler안으로 들어간다.
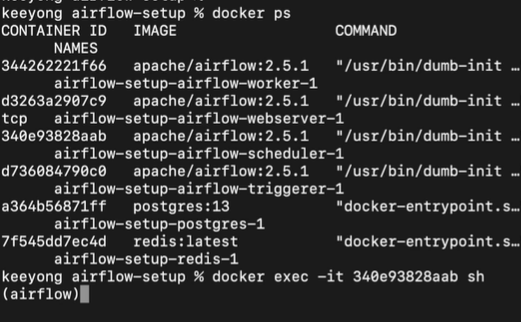

command line에서 variables를 읽을 수 있다.

기타 Q&A
- PostgreHook의 autocommit 파라미터의 Default 값은 False이다. -> 자동으로 commit을 안하고 모든 쓰기 작업은 명시적으로 COMMIT이나 END를 불러야 실제 physical table에 쓰여진다.
- DAG에서 task를 어느 정도로 분리할까? -> 오래 걸리는 DAG는 실패시 재실행이 쉽게 다수의 task로 나눈는것이 좋음
- airflow 자체의 환경이 저장되는 airflow.cfg

3) Yahoo Finance API DAG
애플의 지난 30일간의 주가정보를 읽어오는 DAG를 Full Refresh로 만들어보고
Full Refresh로 만든 DAG를 incremental update 하는 형태로 바꿔보자.

yfinance를 파이썬 모듈을 이용하기 docker에 로그인해서 모듈을 설치해야한다.

지금 우리가 로그인하는 superuser가 아닌 airflow user로 로그인해서 일부 operation을 할 수 없다. 가끔은 root user로..
docker container에 루트 유저로 로그인하는 법은

from airflow import DAG
from airflow.decorators import task
from airflow.providers.postgres.hooks.postgres import PostgresHook
from datetime import datetime
from pandas import Timestamp

import yfinance as yf
import pandas as pd
import logging


def get_Redshift_connection(autocommit=True):
    hook = PostgresHook(postgres_conn_id='redshift_dev_db')
    conn = hook.get_conn()
    conn.autocommit = autocommit
    return conn.cursor()


@task
def get_historical_prices(symbol):  #미국 주식은 symbol이 4개의 글자로
    ticket = yf.Ticker(symbol)
    data = ticket.history() #지난 30일간의 주식 정보를 pandas dataframe형태로 return해준다.
    records = []

    for index, row in data.iterrows():
        date = index.strftime('%Y-%m-%d %H:%M:%S')  # index는 pandas의 timestamp정보이므로 우리가 이해할 수 있는 string형태로 바꾼다.

        records.append([date, row["Open"], row["High"], row["Low"], row["Close"], row["Volume"]])
		#시작가, 최고가, 최저가, 끝날때 주가, 주식 매도매수 물량
    return records

@task
def load(schema, table, records):
    logging.info("load started")
    cur = get_Redshift_connection()
    try:
        cur.execute("BEGIN;")
        cur.execute(f"DROP TABLE IF EXISTS {schema}.{table};")
        cur.execute(f"""
CREATE TABLE {schema}.{table} (
    date date,
    "open" float,
    high float,
    low float,
    close float,
    volume bigint
);""")
        # DELETE FROM을 먼저 수행 -> FULL REFRESH을 하는 형태
        for r in records:
            sql = f"INSERT INTO {schema}.{table} VALUES ('{r[0]}', {r[1]}, {r[2]}, {r[3]}, {r[4]}, {r[5]});"
            print(sql)
            cur.execute(sql)
        cur.execute("COMMIT;")   # cur.execute("END;")
    except Exception as error:
        print(error)
        cur.execute("ROLLBACK;")
        raise

    logging.info("load done")


with DAG(
    dag_id = 'UpdateSymbol',
    start_date = datetime(2023,5,30),
    catchup=False,
    tags=['API'],
    schedule = '0 10 * * *'
) as dag:

    results = get_historical_prices("AAPL")
    load("keeyong", "stock_info", results)
Full Refresh를 할때는
transaction을 열고 해당 원본 테이블 삭제(or record들 다 날리고) 새로 적재하고 transaction 닫는다.

Incremental Update 하려면 load를 바꾸면 된다.
지금의 테이블을 다 날리고 적재하는것이 아닌 지금 테이블 내용에다가 적재하고 거기서 중복을 제거하는 형태로
매일 레코드들이 하루에 하나씩 쌓이는 형태
전의 원본 table을 삭제하지 않고 하루치의 record가 늘어난다.
from airflow import DAG
from airflow.decorators import task
from airflow.providers.postgres.hooks.postgres import PostgresHook
from datetime import datetime
from pandas import Timestamp

import yfinance as yf
import pandas as pd
import logging


def get_Redshift_connection(autocommit=True):
    hook = PostgresHook(postgres_conn_id='redshift_dev_db')
    conn = hook.get_conn()
    conn.autocommit = autocommit
    return conn.cursor()


@task
def get_historical_prices(symbol):
    ticket = yf.Ticker(symbol)
    data = ticket.history()
    records = []

    for index, row in data.iterrows():
        date = index.strftime('%Y-%m-%d %H:%M:%S')
        records.append([date, row["Open"], row["High"], row["Low"], row["Close"], row["Volume"]])

    return records

# 지금까지 full refresh는 항상 table을 drop하고 새로만들었었다.
# 하지만 incremental update은 원본 table이 유지해야된다.
# 따라서 처음 들어갈때는 원본 table이 없을 경우, dag 처음 실행할 경우 대비해서 원본 테이블 한번 만든다.(false)
# 뒤에서는 항상 원본 테이블을 삭제하고 임시 테이블에 있는 내용을 중복 제거해서 원본에 올려준다.(true)
def _create_table(cur, schema, table, drop_first):
    if drop_first:
        cur.execute(f"DROP TABLE IF EXISTS {schema}.{table};")
    cur.execute(f"""
CREATE TABLE IF NOT EXISTS {schema}.{table} (
    date date,
    "open" float,
    high float,
    low float,
    close float,
    volume bigint
);""")


@task
def load(schema, table, records):
    logging.info("load started")
    cur = get_Redshift_connection()
    try:
        cur.execute("BEGIN;")
        # 원본 테이블이 없으면 생성 - 테이블이 처음 한번 만들어질 때 필요한 코드
        _create_table(cur, schema, table, False)
        # 임시 테이블로 원본 테이블을 복사
        cur.execute(f"CREATE TEMP TABLE t AS SELECT * FROM {schema}.{table};")
        for r in records:
            sql = f"INSERT INTO t VALUES ('{r[0]}', {r[1]}, {r[2]}, {r[3]}, {r[4]}, {r[5]});"
            print(sql)
            cur.execute(sql)

        # 원본 테이블 생성
        _create_table(cur, schema, table, True)
        # 임시 테이블 내용을 원본 테이블로 복사
        cur.execute(f"INSERT INTO {schema}.{table} SELECT DISTINCT * FROM t;")
        cur.execute("COMMIT;")   # cur.execute("END;")
    except Exception as error:
        print(error)
        cur.execute("ROLLBACK;")
        raise
    logging.info("load done")


with DAG(
    dag_id = 'UpdateSymbol_v2',
    start_date = datetime(2023,5,30),
    catchup=False,
    tags=['API'],
    schedule = '0 10 * * *'
) as dag:

    results = get_historical_prices("AAPL")
    load("keeyong", "stock_info_v2", results)
원본 테이블과 동일한 임시 테이블을 생성하면서 현재 테이블의 레코드를 복사 (CREATE TEMP TABLE ...AS SELECT)
임시 테이블로 Yahoo Finance API로 읽어온 레코드 적재
원본 테이블을 삭제하고 새로 생성
원본 테이블에 임시 테이블의 내용을 복사 (이 때 SELECT DISTINCT *를 사용하여 중복 제거)
위의 3~4번 째 step들을 트랜잭션 형태로 구성한다.(transaction 걸리는 영역은 최소화하는게 좋다.)
Insert INTO SELECT: Table이 이미 만들어진 상황에서 그 테이블에다가 select한 결과를 적재

'Data Engineer > 데브코스' 카테고리의 다른 글
| 데브코스 데이터 엔지니어링 WEEK10 WIL(3) (0) | 2024.12.17 |
|---|---|
| 데브코스 데이터 엔지니어링 WEEK11 WIL(1) (0) | 2024.11.19 |
| 데브코스 데이터 엔지니어링 WEEK10 WIL(1) (0) | 2024.11.19 |
| 데브코스 데이터 엔지니어링 WEEK8 WIL(2) (0) | 2024.11.19 |
| 데브코스 데이터 엔지니어링 WEEK8 WIL(1) (0) | 2024.11.07 |